
No sooner did I write my post about CircuitPython 9.1 beta 2, then CircuitPython 9.1 beta 3 dropped with 24 hours of beta 2’s release. Apparently beta 2 introduced an “issue” (i.e. major bug) with the adafruit_esp32spi library. A bit of irony because I can’t get any CircuitPython builds to install on any of my Espressif ESP32-S3 boards, even though the CircuitPython site explicitly calls those boards out as being supported. Instead I’m using CircuitPython on every board except Espressif boards.
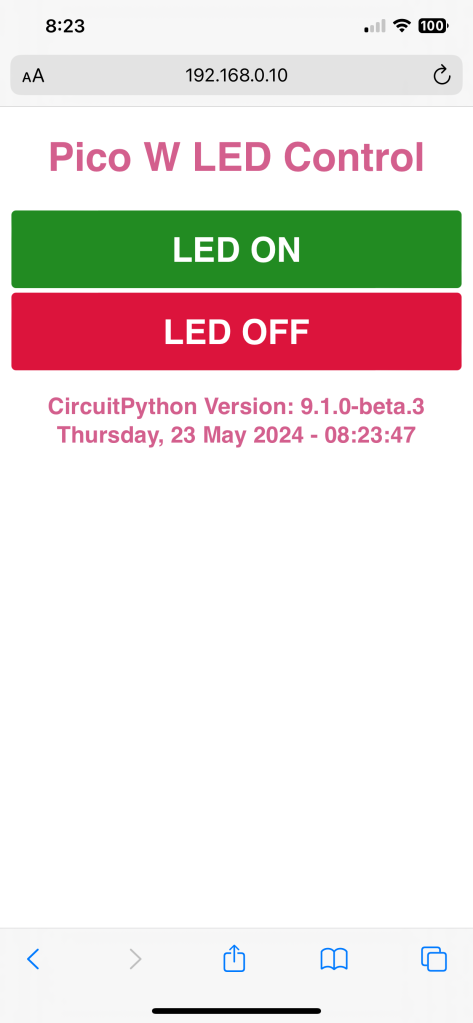
Rather than repeat the same code drop from yesterday, I added the ability to query the internet for time via NTP and the adafruit_ntp library. You can see the one line that sets up an ntp instance to query for time on the network at line 47 in the listing below, and the function format_ntp at line 57 does exactly that, creating a string with formatted time. The lead-in screen capture shows how the date and time are formatted, right beneath the displayed CircuitPython version. If you need accurate time in your project, and if you’re connected to the internet via WiFi with this device, then using the Adafruit NTP library is super easy to set up.
One other note: there’s a new property to define in your settings.toml file named TZ_OFFSET, or the timezone offset. That’s used to set up the ntp instance. I have mine set to -4 for eastern daylight time.
import osimport timeimport ipaddressimport wifiimport socketpoolimport boardimport microcontrollerimport adafruit_connection_managerimport adafruit_ntpfrom digitalio import DigitalInOut, Directionfrom adafruit_httpserver import Server, Request, Response, POST# On-device LED setupled = DigitalInOut(board.LED)led.direction = Direction.OUTPUTled.value = False# Connect to a local WiFi access point.# Because this code is running in a CircuitPython 9 or later environment,# it requires a settings.toml file be created with at least the following# six lines:## AP_SSID = "WIFI SSID"# AP_PASSWORD = "WIFI PASSWORD"# STATIC_IP = "IP4 dotted IP address"# GATEWAY = "192.168.0.1"# TZ_OFFSET = -4# DEBUG = "True" ## DEBUG can be either True or False.ipv4 = ipaddress.IPv4Address(os.getenv('STATIC_IP'))netmask = ipaddress.IPv4Address("255.255.255.0")gateway = ipaddress.IPv4Address(os.getenv('GATEWAY'))wifi.radio.set_ipv4_address(ipv4=ipv4,netmask=netmask,gateway=gateway)wifi.radio.connect(os.getenv('AP_SSID'), os.getenv('AP_PASSWORD'))print(" Connected to WiFi access point...")pool = socketpool.SocketPool(wifi.radio)server = Server(pool, "/static", debug=os.getenv('DEBUG'))# Create Network Time Protocol (NTP) query instance. Use it to get the time.ntp = adafruit_ntp.NTP(pool, tz_offset = os.getenv('TZ_OFFSET'))# This is where the ntp instance created above is used. Get the time at the# instance the function is called, then format the raw data into a human# readable string.## The format is:# dayname, monthday monthname year - hour:min:sec# where the time is in 24 hour format.def format_ntp():dayname = ["Monday","Tuesday","Wednesday","Thursday","Friday","Saturday","Sunday",]monthname = ["January","February","March","April","May","June","July","August","September","October","November","December" ]now = ntp.datetimereturn f"{dayname[now.tm_wday]}, {now.tm_mday} {monthname[now.tm_mon-1]} {now.tm_year} - {now.tm_hour:02}:{now.tm_min:02}:{now.tm_sec:02}"# Write the HTML page body as a Python 3 'f' string for advanced formatting.## Double curly braces {{ and }} are used when HTML needs single braces for HTML# page elements such as CSS styling.font_family = "sans-serif"def webpage():html = f"""<!DOCTYPE html><html><head><meta http-equiv="Content-type" content="text/html;charset=utf-8"><meta name="viewport" content="width=device-width, initial-scale=1"><style>html{{font-family: {font_family};background-color: #FFFFFF;display:inline-block;margin: 0px auto;text-align: center;}}h1{{color:#D35F8D;word-wrap: break-word;font-size: 35px;}}h2{{color:#D35F8D;word-wrap: break-word;font-size: 20px;}}p{{font-size: 1.5rem;word-wrap: break-word;}}.button-red{{font-family: {font_family};display: inline-block;width: 99%;background-color: #DC143C;border: none;border-radius: 4px;color: white;padding: 16px 40px;text-decoration: none;font-size: 30px;margin: 2px;cursor: pointer;}}.button-green{{font-family: {font_family};display: inline-block;width: 99%;background-color: #228B22;border: none;border-radius: 4px;color: white;padding: 16px 40px;text-decoration: none;font-size: 30px;margin: 2px;cursor: pointer;}}p.dotted {{margin: auto;width: 90%;font-size:25px;text-align: center;}}</style></head><body><title>Pico W LED Control</title><h1>Pico W LED Control</h1><form accept-charset="utf-8" method="POST"><button class="button-green" name="LED ON" value="ON" type="submit">LED ON</button></a><button class="button-red" name="LED OFF" value="OFF" type="submit">LED OFF</button></a></form><h2>CircuitPython Version: {os.uname().version.split(' ')[0]}<br/>{format_ntp()}</h2></body></html>"""return html# Default route static IP@server.route("/")def base(request: Request): # pylint: disable=unused-argumentreturn Response(request, f"{webpage()}", content_type='text/html')# Determine which button was pressed and execute that button's associated# action.@server.route("/", POST)def buttonpress(request: Request):raw_text = request.raw_request.decode("utf8")print(raw_text)## If the led on button was pressed...if "ON" in raw_text:led.value = True## If the led off button was pressed...if "OFF" in raw_text:led.value = Falsereturn Response(request, f"{webpage()}", content_type='text/html')print(" Starting HTTP server...")try:server.start(str(wifi.radio.ipv4_address))print(f" Listening on http://{wifi.radio.ipv4_address}")## If the server fails to start then reset the Pico W.# If there is a hardware failure then this can put the software into a# boot loop. That's why the time.sleep(5) is there so that a Ctrl C can exit# at the REPL during development.#except OSError:print(" !!! OSError Exception, Waiting !!!")time.sleep(5)print(" !!! OSError Exception, Restarting !!!")microcontroller.reset()print(" Start polling...")## DO NOT hard code the while loop as True,# instead provide a test and exit if something goes wrong.#is_healthy = True;while is_healthy:try:# Poll for incoming requests.server.poll()except Exception as e:print(e)is_healthy = Falsecontinue

You must be logged in to post a comment.