I don’t know when I purchased this book, but I’m pretty sure it was 2018. The publishing date is October 2017. When I first saw the book I was pleasantly surprised there was an official O’Reilly book on the subject. Up to that point it’d been something of a hobby language for me on Adafruit’s Circuit Express (CircuitPython) and the BBC’s micro:bit v1 (MicroPython). If you don’t know already, CircuitPython is a fork of MicroPython with some unique to-Adafruit touches.
The book is nearing four years after initial publication, which is a very long time in the business of dead-tree computer texts. If the author worked with a then-current release of MicroPython, then that would be one of the version 1.9 point releases. Today, MicroPython is at 1.18, and quite a bit has been fixed and added along the way. Let me illustrate by way of an example using the Raspbery Pi Pico with the RP2040 dual-core microcontroller.
One of the very first programs that is offered in any language is “Hello, World!” It’s usually anywhere from a single line, up to several, depending on the language. To illustrate how easy it is to get started in physical computing and IoT programming, all languages ported to computers such as the Raspberry Pi or the Pi Pico have extensions and modules that allow you to interact with external electrical devices, such as an LED. Thus the equivalent of “Hello, World!” in this context is blinking an LED. Using a Raspberry Pi Pico with MicroPython version 1.18 installed, this is what that looks like. I’ll be typing this in to the REPL.
>>> from machine import Pin, Timer>>> led = Pin(25, Pin.OUT)>>> timer.init(period=500, mode=Timer.PERIODIC, callback=lambda t:led.toggle())>>>
In three lines of code, we imported libraries that are part of the main MicroPython installation, set up a variable to manipulate the built-in physical LED attached to GPIO pin 25, and then used a Timer class instance to toggle the LED every 500 mS, or every 1/2 second. When you look on the Pico board after executing timer.init(...), the on-board green LED is indeed flashing every 1/2 second. You would not have found any of this in the current book. I found it quite by accident while looking for something else in the current MicroPython online documentation here: https://docs.micropython.org/en/latest/rp2/quickref.html .
This isn’t to say the book is bad. it still has a large amount of good information to convey if you approach the material as a starting point. Chapter 13 in particular gives excellent advice on how to write good idiomatic MicroPython on these microcontrollers, advice which is still relevant today. What needs to be done to produce a second addition is
cover updates to some of the micro controller boards, for example
micro:bit version 2,
Adafruit’s Circuit Playground Bluetooth,
an updated ESP32,
the ESP32-C3 with RISC-V that replaces the ESP-8266,
and the Raspberry Pi Pico/RP2040 (and Adafruit’s Feather RP2040).
cover the updates from MicroPython v 1.9 to today’s version (which is currently at 1.18),
add coverage to Adafruit’s Circuit Python
document real examples of CircuitPython/MicroPython on real space hardware, citing PyCubed ( https://pycubed.org ) and the V-R3x space mission ( http://vr3x.space ), just to name two examples here.
Quite a bit has advanced over the last four years, and needs to be captured in a second edition. I wish I could help, but I don’t have the original document to work from. I’m not about to say writing a second edition would be easy. I’ve written enough proposals and technical manuals in my days to appreciate the effort required to write clearly, correctly, and engagingly to your audience. But I do wish I could help bring about a second edition, if nothing else by supporting the original author.
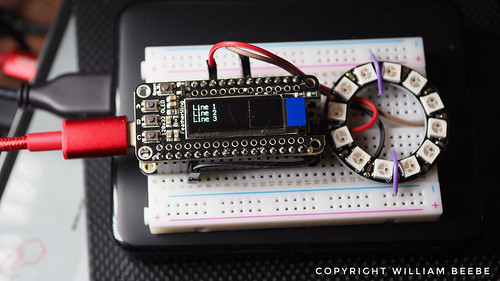
Here we are with what is probably, practically, a reasonable stopping point for refactoring my Circuit Python code. In this post I’ve broken up the earlier monolithic code.py into a series of smaller, more easily understandable and maintainable files, and then rewritten code.py to make use of the new code structure. Before we start digging through the code, let’s see what it does now.
Everything is reset and initialized, showing three lines of text.
I wrote in the last refactoring post that one of my goals was to create a class to manipulate the Featherwing’s OLED display. That class would initialize the display and provide convenience methods to change the text across three horizontal lines on the OLED display.
Why only three lines of text? The OLED display has a pixel resolution of 132 pixels long by 32 pixels high. A single line of text has a height of 8 pixels. Add a 1 pixel space at the top, and another at the bottom, and a line of text across the OLED now takes 10 pixels of height. With only 32 pixels total, I can at best clearly display only three lines of horizontal text. The OLED control class shows those three lines when the software restarts, as you can see above. Those lines are part of the initialization routine, which I’ll show later.
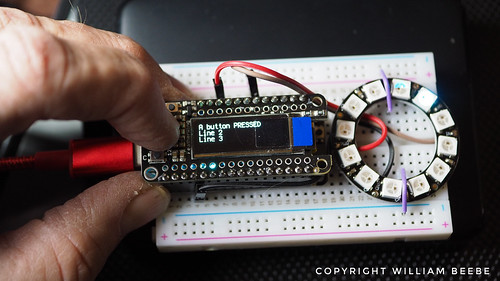
Now to test. I’ve reached over and pressed the ‘A’ button on the edge of the Featherwing. That actions causes ‘A button PRESSED’ to be displayed on the first line.
When I release the ‘A’ button, ‘A button released’ is displayed on line 1. The ‘B’ button modifies line 2, and the ‘C’ button modifies line 3 with similar text messages. Meanwhile the NeoPixels are doing their thing while all this is happening. My current system isn’t perfect. If you pay close attention to the spinning NeoPixel ring, you’ll see a very brief stop in the circulation, then it picks back up again. Releasing the button causes the same issue. Now let’s look at the code.
The main code body, code.py, is considerably smaller than the last version. The Python code is used to “wire” the button states (pressed and released) to respective functions on the display class, Oled. Note how the while True loop has been reduced to just two lines of code. As I had originally planned, I modified the call cycle_colors() to take check_button_states() as an argument so that it could be called within the inner loop setting the NeoPixel ring LEDs. The response to button presses and releases now appears to be nearly instantaneous as the text on the OLED changes according to the button presses. But as I noted above it’s not perfect, everything is still executing in linear order, and is not true multitasking nor threading nor concurrent.
The code is in a good enough shape. It could stand more comments, but from a practical standpoint it’s suitable to build upon for my next project. I’m done with this stage. I know it’s not perfect, but as I read somewhere, “Perfect is the enemy of done.”
import boardimport displayioimport terminaliofrom adafruit_display_text import labelimport adafruit_displayio_ssd1306class Oled():def __init__(self):# Initialize the I2C bus connected to the display.# Initialize the display.#displayio.release_displays()self.i2c = board.I2C()self.display_bus = displayio.I2CDisplay(self.i2c, device_address=0x3C)self.display = adafruit_displayio_ssd1306.SSD1306(self.display_bus, width=128, height=32)# Fill the background with black.# This is a monochrome display, so there can be only black# or white.#self.splash = displayio.Group()self.display.show(self.splash)self.color_bitmap = displayio.Bitmap(128, 32, 1)self.color_palette = displayio.Palette(1)self.color_palette[0] = 0x000000 # Blackself.background_sprite = displayio.TileGrid(self.color_bitmap, pixel_shader=self.color_palette, x=0, y=0)self.splash.append(self.background_sprite)self.label1 = label.Label(terminalio.FONT, text="Line 1", color=0xFFFFFF, x=0, y=3)self.splash.append(self.label1)self.label2 = label.Label(terminalio.FONT, text="Line 2", color=0xFFFFFF, x=0, y=13)self.splash.append(self.label2)self.label3 = label.Label(terminalio.FONT, text="Line 3", color=0xFFFFFF, x=0, y=23)self.splash.append(self.label3)def display_line1(self, text):self.label1._update_text(text)def display_line2(self, text):self.label2._update_text(text)def display_line3(self, text):self.label3._update_text(text)
The Oled class is mostly initialization and setup for the OLED display. The public convenience methods display_line1, display_line2, and display_line3 are wrappers around calling _update_text.
import boardfrom digitalio import DigitalInOut, Direction, Pull# Declare a class for all three buttons, A, B, and C.#class Buttons():def __init__(self):self.a_pressed = Falseself.b_pressed = Falseself.c_pressed = Falseself.a_pressed_func = lambda : Noneself.a_released_func = lambda : Noneself.b_pressed_func = lambda : Noneself.b_released_func = lambda : Noneself.c_pressed_func = lambda : Noneself.c_released_func = lambda : Noneself.a_button = DigitalInOut(board.D9)self.a_button.direction = Direction.INPUTself.a_button.pull = Pull.UPself.b_button = DigitalInOut(board.D6)self.b_button.direction = Direction.INPUTself.b_button.pull = Pull.UPself.c_button = DigitalInOut(board.D5)self.c_button.direction = Direction.INPUTself.c_button.pull = Pull.UP# Check when a button has been pressed, and when it's# released after being pressed.#def check_button_states(self):if (self.a_button.value is not True):if (not self.a_pressed):self.a_pressed_func()self.a_pressed = Trueelse:if (self.a_pressed):self.a_released_func()self.a_pressed = Falseif (self.b_button.value is not True):if (not self.b_pressed):self.b_pressed_func()self.b_pressed = Trueelse:if (self.b_pressed):self.b_released_func()self.b_pressed = Falseif (self.c_button.value is not True):if (not self.c_pressed):self.c_pressed_func()self.c_pressed = Trueelse:if (self.c_pressed):self.c_released_func()self.c_pressed = False
The class Buttons code should be quite familiar as that’s what’s been carried along now since it was originally part of code.py. Now that code has been removed and used to build the class. I much prefer this because there’s no need to declare any variables as global. Scope is now within the class.
import timeimport boardimport neopixel# For the single neopixel on the Feather itself.#s_neopixel = neopixel.NeoPixel(board.NEOPIXEL, 1, brightness=0.2, auto_write=False, pixel_order=neopixel.GRB)# For the 12 neopixel ring attached to the Feather.#neopixel_ring = neopixel.NeoPixel(board.D10, 12, brightness=0.2, auto_write=True, pixel_order=neopixel.GRB)# All the NeoPixel colors we want to display.# Even though there are four values in each color tuple,# the library code will know how to handle the late value,# which is white, and not send it to the GRB only# NeoPixels on the ring.#neopixel_colors = [(64,0,0,0), # red(0,64,0,0), # green(0,0,64,0), # blue(64,16,0,0),# orange(0,32,32,0),# cyan(0,0,0,0) # black]# Send colors to all our NeoPixels.#def cycle_colors( remote_func = lambda : None):for color in neopixel_colors:s_neopixel.fill(color)s_neopixel.show()for i in range(len(neopixel_ring)):neopixel_ring[i-1] = (0,0,0,0) # turn LED offneopixel_ring[i] = colorneopixel_ring.show()remote_func()time.sleep(.03)
Finally, the code for running all the NeoPixels. This isn’t a class, just the function and data used by that function. Note that passing in a callable function to cycle_colors() is optional. If nothing is passed in then when remote_func() is called it defaults to a no operation.


You must be logged in to post a comment.