migrating a python 3.9 virtual environment to python 3.10

I’m executing this on an M1 2020 MacBook Pro running macOS Monterey 12.4 and with Homebrew 3.4.11. This post shows how I migrated my Python 3.9 virtual environment’s site packages (the heart of a Python installation) to Python 3.10. The site packages are added to an environment whenever you perform a pip install ....

I do all my Python development completely within virtual environments. Python provides built-in tools to help you create and manage one or more virtual environments. A virtual environment is important as it provides a sandbox in which you, as the developer, can try anything you want to try, and won’t corrupt the base machine-wide Python environment. And if you reach the point where your Python virtual environment has gone sideways, it’s simple to create a new one to carry on. On this Mac I have one of my Python virtual environments at
$HOME/Development/VPython

When I want to create a virtual environment, for example for Python 3.10.4, I cd into the VPython folder and I run
/opt/homebrew/Cellar/python@3.10/3.10.4/bin/python3 -m venv 310

That creates a new subfolder into which all the virtual environment is located:
$HOME/Development/VPython/310

The reason for the long path to invoke Python 3.10.4 is because that’s where Homebrew installed it. I didn’t ask for that particular path, that’s just its default for the macOS environment.

I already have a virtual environment created for Python 3.9.12. With the new Python 3.10.4 virtual environment created I’m now ready to export my Python 3.9 site packages to Python 3.10 virtual environment. To start the process I need a list of what’s in the Python 3.9 virtual environment by activating the Python 3.9 virtual environment.

cd $HOME/Development/VPythonsource 39/bin/activatepip freeze > requirements.txt

You now have a complete list of all site packages in that virtual environment, complete with version numbers.

head requirements.txtanyio==3.5.0appnope==0.1.3argon2-cffi==21.3.0argon2-cffi-bindings==21.2.0asttokens==2.0.5attrs==21.4.0Babel==2.10.1backcall==0.2.0beautifulsoup4==4.11.1bitstring==3.1.9

You can use requirements.txt to perform the import into the new Python virtual environment, except those version numbers can be a pain, especially if there are more up-to-date releases. I have encountered import failures in the past due to version restrictions due to explicit version requirements. I would strongly suggest that you remove those versions before using the requirements file.

cat requirements.txt | sed -e 's/=.*//' > requirements2.txthead requirements2.txtanyioappnopeargon2-cffiargon2-cffi-bindingsasttokensattrsBabelbackcallbeautifulsoup4bitstring

The sed (stream editor) command is using a simple regular expression to remove all text starting with the first equals symbol to the end of each line. I’m piping the results into another text file. Now you’re ready to import into the new Python virtual environment using the edited requirements.

I always open a second terminal to do the import so the original terminal remains in case something else needs to be done. So open a second terminal and in that terminal activate the Python 3.10 virtual environment. I’m going to assume in that new terminal you cd into your virtual Python top level folder as you did before.

cd $HOME/Development/VPythonsource 310/bin/activate

Now import using requirements2.txt.

pip install -r ./requirements2.txt...lots of output as each package is installed......

During the mass install process you may see that some packages aren’t installed because of version collisions on other dependent packages that were installed earlier. When the mass import is finished, import each of those that errored out by hand, and the collisions will clean themselves up. Yes, it’s a pain, but then that’s the charm of any software system, its little quirks. The process I’ve outline will save lots of hours. I spent maybe 20 minutes doing all of these steps migrating hundreds of site packages.

sharing a pop!_os folder with macOS on a macbook pro

There’s one activity that’s very simple, and thus very easy to do on Windows, and that’s to share a folder. Unless you’re trying to do this in a work environment in which that feature has been locked down by corporate IT and group policy. But for home use, it’s not a problem for families with more than one Windows machine. That same feature is difficult under Linux, even under Pop!_OS, and Ubuntu from which Pop!_OS is derived. Today we’re going to talk about  configuring Pop!_OS to share a folder with macOS.

Even though we’re not using Windows anywhere in this note, we will be using Microsoft Window’s Server Message Block (SMB) protocol, which has become something if a defacto standard. To enable the feature on Pop!_OS you’ll need to install the Samba (  https://www.samba.org ) package via apt. Once that’s installed you need to check that the smb service (smbd) is running:

popos@pop-os:~/Develop/esp$ systemctl status smbd● smbd.service - Samba SMB Daemon Loaded: loaded (/lib/systemd/system/smbd.service; enabled; vendor preset: enabled) Active: active (running) since Fri 2022-02-04 15:33:18 EST; 6 days ago   Docs: man:smbd(8) man:samba(7) man:smb.conf(5)   Main PID: 13193 (smbd) Status: "smbd: ready to serve connections..."  Tasks: 6 (limit: 18750) Memory: 16.5MCPU: 16.894s CGroup: /system.slice/smbd.service ├─ 13193 /usr/sbin/smbd --foreground --no-process-group ├─ 13195 /usr/sbin/smbd --foreground --no-process-group ├─ 13196 /usr/sbin/smbd --foreground --no-process-group ├─ 13197 /usr/sbin/smbd --foreground --no-process-group ├─121552 /usr/sbin/smbd --foreground --no-process-group └─187324 /usr/sbin/smbd --foreground --no-process-groupFeb 08 23:50:17 pop-os smbd[122153]: pam_unix(samba:session): session closed for user nobodyFeb 09 15:55:46 pop-os smbd[130708]: pam_unix(samba:session): session closed for user nobodyFeb 09 20:00:26 pop-os smbd[143212]: pam_unix(samba:session): session closed for user nobodyFeb 10 00:42:15 pop-os smbd[149827]: pam_unix(samba:session): session closed for user nobodyFeb 10 06:40:35 pop-os smbd[156237]: pam_unix(samba:session): session closed for user nobodyFeb 10 11:52:54 pop-os smbd[156669]: pam_unix(samba:session): session closed for user nobodyFeb 10 16:01:56 pop-os smbd[160965]: pam_unix(samba:session): session closed for user nobodyFeb 10 17:22:46 pop-os smbd[162848]: pam_unix(samba:session): session closed for user nobodyFeb 10 19:36:01 pop-os smbd[164019]: pam_unix(samba:session): session closed for user nobodyFeb 11 08:05:19 pop-os smbd[186663]: pam_unix(samba:session): session closed for user nobody

We’re interested in lines 3 and 4, which shows that the smbd service is up and running. If it’s not, then you’ll need to debug why by looking at logs under /var/log/samba. No, I won’t even begin to go down that path. Instead I’ll leave it as an exercise for the reader. Anyway…

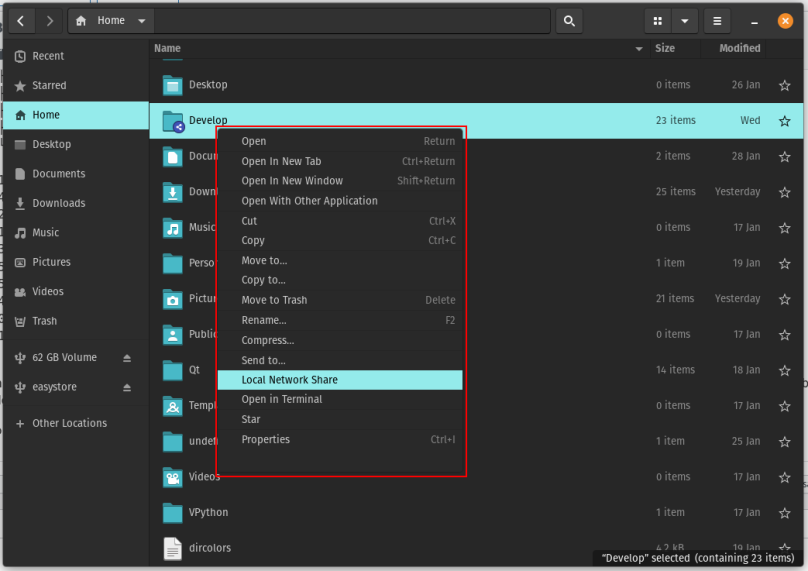
The next step is to open the Pop!_OS file manager and right click on the folder you want to share. In my example I wanted to share Develop; in this post I’ve already shared it, that’s why you see the blue sideways ‘V’ on the lower left corner of Develop’s folder.

Note that Develop is already shared by the sideways blue ‘V’

Then click Local Network Share:

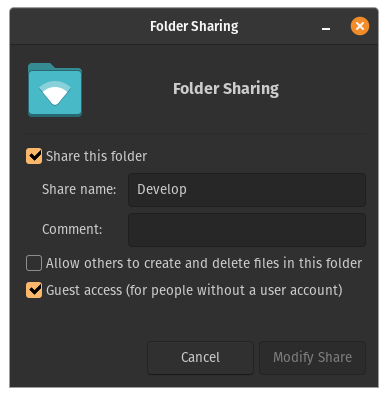
Make sure that “Share this folder” is checked as well as “Guest access…”. I set it up so that I could copy files across to my Mac. Once all of that is done, there is one more action you need to perform. You need to set the permissions on your home folder to 755 (chown 755 /home/<your_home_folder>). Today’s distributions set that to either 750 or even 700. If you don’t set permissions accordingly then the Mac will say it can’t find the folder you’re sharing on your Linux system, even though the Mac will actually show it, and on the Mac side smbd will log into /var/log/samba that your don’t have access rights to your shared folders.

I did this so that I could copy documents I created on Pop!_OS and saved out as PDF over to my Mac for further inclusion into other work.