
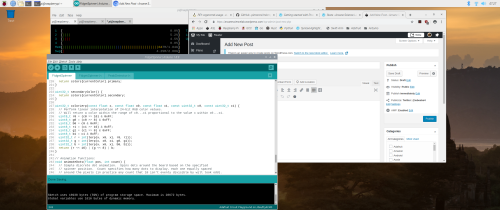
Working with the Raspberry Pi 4B continues. I installed the Arduino IDE version 1.8.9 (https://www.arduino.cc/en/Main/Software) and was able to quickly start it and have it working with a Circuit Playground Express. I found a sample C++ program on GitHub (https://github.com/adafruit/Adafruit_CircuitPlayground/tree/master/examples/FidgetSpinner) and created a simple project, compiling it, but not uploading it. That will come later. I just wanted to check out the basic installation to see if it worked up to a point, and it all does. My only comment is that when you download the IDE that you choose the ARM 32-bit version. It’s a standard tar file, no compression. Once untarred, then execute install.sh. It will not only place everything where it needs to be, but set up permissions, groups, and add a menu entry under Programming.
The IDE seems fully functional. One aspect of using the IDE natively on the RPi 4B with 2GB is that compiles are noticeably slower than they are on my MacBook Pro. But that’s to be expected, and the time taken is not excessive. Just noticeable.
During this period of testing I’ve also managed to force Raspbian to hit the swap space. Unlike the 1GB RPi 4B, the 2GB version’s use of swap is one to two orders less than the 1GB version with the same application load. Right now I’m seeing 4.5MB out of 2GB of swap being used, or essentially next to nothing.
Finally, I installed two more software packages, Swift for ARM and PowerShell Version 7 Preview 2 for ARM.
In order to install Swift on Raspbian Buster, you neeed to add a reference to the repo, then install Swift from that repo. Those steps are:
curl -s https://packagecloud.io/install/repositories/swift-arm/release/script.deb.sh | sudo bashsudo apt install swift5=5.0.2-v0.4
Once installed you can run this basic test:
pi@raspberrypi:~ $ swiftc --versionSwift version 5.0.2 (swift-5.0.2-RELEASE)Target: armv6-unknown-linux-gnueabihfpi@raspberrypi:~ $
You can read about Swift ARM here: https://swift-arm.com/
Note that you should check to see what the current version of Swift ARM is when you install. I chose 5.0.2-v0.4 because that was what was published in the announcement on the web site.
PowerShell Core for Raspbian Buster is available as a regular tar file here: https://github.com/PowerShell/PowerShell/releases
Once downloaded, create a directory on your login home. In my case I simply created ~/powershell. Step into it and untar the newly downloaded archive into the newly created directory. Once untarred simply run pwsh. For example:
pi@raspberrypi:~/powershell $ ./pwsh PowerShell 7.0.0-preview.2Copyright (c) Microsoft Corporation. All rights reserved.https://aka.ms/powershellType 'help' to get help.PS /home/pi/powershell> $PSVersionTableName Value---- -----PSVersion 7.0.0-preview.2PSEdition CoreGitCommitId7.0.0-preview.2OS Linux 4.19.58-v7l+ #1245 SMP Fri Jul 12 17:31:45 BST 2019Platform UnixPSCompatibleVersions {1.0, 2.0, 3.0, 4.0…}PSRemotingProtocolVersion 2.3SerializationVersion 1.1.0.1WSManStackVersion 3.0PS /home/pi/powershell> And that’s about it.
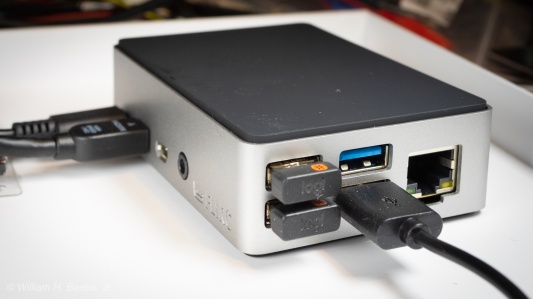
One more thing. The Flirc case runs warm, but not excessively so. CPU temperatures seem to run between 45°C and 50°C. I’m still working on a 40-pin ribbon cable connector that will easily fit inside the case over the GPIO header.

You must be logged in to post a comment.