
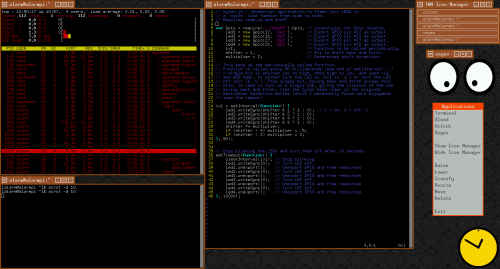
I chose TWM because it’s the simplest desktop environment and has one of the smallest footprints if not the smallest. On a machine such as the Raspberry Pi 3 with its fixed memory size of 1GB (which is hard-wired into the card and can’t be upgraded, not even with a plugin extension), what the RP3 (and all its predecessors) required of their human programmers was an understanding of its limitations helping to choose the best applications to run on the card. Ever since I bought and powered up the first generation, I’ve always sought software that demanded as little resources as possible, especially memory. TWM, of all the DEs I’m familiar with, demands the smallest memory footprint of all. The screen shot above, the one I used in an earlier post, ran overnight for 14 hours, with the three xterms on the desktop, and top (or htop in this instance) running in one of the windows.
Looking at the upper left corner of the htop terminal, you’ll note that only a fraction of the .9GB (out of 1GBl; remember that part of this is shared and used by the GPU). You should also note that swap hasn’t been touched. In all other distributions and versions I’ve used in the past, some sort of cron job would kick off or the DE would make much more demands of the memory. To be honest I’m not sure that swap is enabled here; after looking at the screen capture I need to go check that. Regardless, the memory footprint of the OS and DE are quite small after 14 hours, something for an embedded computer I’m quite appreciative off.
And this brings up a final point. Eventually I want to tuck this computer into a corner somewhere and not worry about it. Not forget about it, but get it to the point where I don’t have to worry that it’s run out of memory and swap and locked up horribly. I can reach that goal with a custom executive or other non-Linux runtime, but that costs hard cash up front as well as on-going royalties. That’s not a problem if you’re creating a commercial product in which a computer is just an out-of-sight appliance. But for someone such as myself, with no resources, I need to carefully choreograph all of this to create something that I could sell with a clear conscious. I also want to point out that this is not a general purpose computer that would require something like Raspian, that might run Libre Office (and a lot of other applications that are in that distributions). TWM is little more than a light-weight xterm manager, if you will. I could not even install all the X packages to support TWM and just live within the seven virtual logins provided by the ALT function keys, something I did for a number of years when Linux was first released. The DE for my use is thus a means to an end, not an end unto itself, and it doesn’t need all the fancy features that all other contemporary DEs have accumulated over the years. TWM is just fine for my purposes.


You must be logged in to post a comment.