raspberry pi 4 first contact

Raspberry Pi 4/1GB in the foreground, with an encased Raspberry Pi 3B+ in the background with a micro:bit on top.

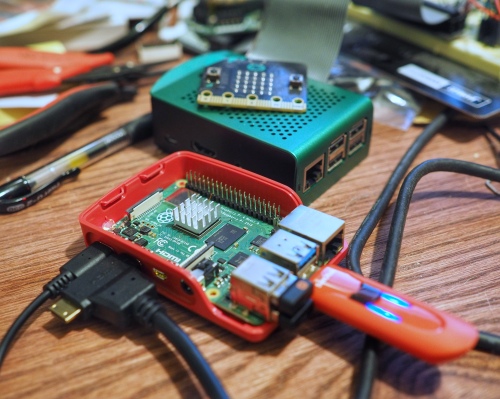
I’m now the proud owner of a Raspberry Pi 4 with 1GB of memory. It arrived via Adafruit (as do just about all my electronics these days) for $35 plus shipping and tax. I also ordered an official case and 15W USB-C power supply. When it arrived this past Friday I had everything I needed to power it up.

The Raspberry Pi 4 has not been that easy to get going. Although I’m running the latest Raspbian Buster (with all updates and the vl805 firmware update) it has been something of a challenge to get into a stable state. The board runs hot (even with the VL805 update) not just on the processor, but all across the board. Uncomfortably hot. Right now ‘vcgencmd measure_temp’ reports 59C, although I’ve seen it hit the high 60s. I don’t know what temperature the 3B+ runs at, but it barely gets warm to the touch, not too hot to handle like the 4.

Those new 4K video micro HDMI ports have also been a real pain. I have a 34″ LG 34UM61-P 21:9 UltraWide® Full HD IPS LED monitor which has worked just fine with every computer in my household, Raspberry Pi through various Macs and Windows PCs. When I attached it to the Raspberry Pi 4, the 4 took a long time before it stabilized and I saw the desktop. When they say 4K, they aren’t kidding. There’s no fall-back, no adaptive video controller on the 4. In order to help the desktop startup quickly, once the Raspbian Buster desktop booted and became visible I configured the Raspbian desktop to display at 1680 x 1050, which is the resolution that the Raspberry Pi 3’s all arrive at automatically.

I researched for a possible 4K monitor to use with the Raspberry Pi 4, but after looking I decided I’m not about to drop between $300 to $400 for a new monitor just so I can use it with a $35 computer (even $55 with 4GB of RAM). For a computer that’s supposed to be approachable by nearly anyone, especially due to its initial cost, having to spend an order of magnitude more money on additional equipment just to display 4K is asking a bit much.

Performance wise the 4 is definitely fast. Noticeably faster than the 3s I have. But I’ve also switched to Raspbian Buster on all my 3s, and they’ve gotten speedier as well.

I’ll continue to work with the 4, but for now I’m putting it off to the side for a bit and going back to the 3s. I’m not in the market for greater speed if said speed causes the board to run as hot as this one does. Between the high temperatures and the 4K only video outputs, the Raspberry Pi 4 is currently something of a mess.

Update 7 July

I powered up the 3B+ in the green enclosure sitting behind the 4 in the photo above and measured the temperature after letting it run overnight and it shows 53C. In spite of that high an operating temperature it’s still just warm to the touch. What makes this possible I believe is helped in part by all the heat sinks all over the board. There is one on the SoC, then a second on the peripheral chip, and then a flat piece of copper on the memory chip. The 3B+ is physically different from the 4 in that the 4 has all its ICs on the top side of the board, while the 3B+ has its memory soldered to the bottom. And there’s an extra peripheral chip on the 4 that’s missing on the 3B+. I believe that new chip is to support native Gigabit Ethernet on the 4. One lesson here is to find and attach additional heat sinks for the 4 and look a the temperature issue again.

I should also note that the 3B+ is inside an all-metal (aluminum) case with considerable venting; look again at the photo above and the green block with all the vent holes in the top, behind the 4. I’ve been waiting to see if I can find the equivalent for the 4 on sale, but I haven’t seen it yet. If it ever does I will certainly purchase a few for the latest Raspberry Pi. Having said that, I ran the Raspberry Pi 4 with the enclosure top removed as shown in the photo above.

dabbling in pyqt5 on a raspberry pi 3 b+, part 3

PyQt5 QTableWidget with a section of cells selected.

I’m still learning about PyQt5 on the Raspberry Pi. In this little experiment I’m learning how to create a simple table using QTableWidget, similar to a spreadsheet. This example shows

  • How to invoke it
  • How to connect to various event triggers
  • How to manage the look of the table

The code is a bit longer than my other posts so far, weighing in at 113 lines. And it’s noticeably incomplete. But it’s still work publishing at this point, if for no other reason that if I don’t do it now I don’t know when I will, because I don’t know if or when I’ll finish it enough to be useful. But as an example, it’s useful enough for those who might need an idea or two.

What I’ll note so far is that the events triggered while manipulating the cells in the table are a bit peculiar. The only event that fires first, and reliably, is the cellPressed event. It will fire every time the cell is selected with a left mouse button down. Right after you get the cellClicked() event, most of the time. But I’ve seen instances where cellClicked() isn’t fired 100% of the time.

The cell contents are all modifiable, and if you make a change and hit return, then the cellChanged() event is reliably fired every time. My next steps are to add menus and right-mouse-button enabling for editing capabilities. And I’m trying to determine how to programatically determine the range of multiple cell selection as the screen cap shows at the beginning. What comes out is very peculiar and not reliable. I’m beginning to wonder if there isn’t a bug in the PyQt5 QTableWidget.

#!/usr/bin/env python3import sys, osfrom PyQt5.QtWidgets import (QApplication,QWidget,QTableWidget,QTableWidgetItem,QVBoxLayout)from PyQt5.QtGui import QColorclass App(QWidget):def __init__(self):super().__init__()self.setWindowTitle('PyQt5 Table Example')self.setGeometry(100, 100, 800, 600)# Create a table, create a box layout, add the table to box layout and# then set the overall widget layout to the box layout.#self.createTable()self.layout = QVBoxLayout()self.layout.addWidget(self.tableWidget) self.setLayout(self.layout) self.show()# Create a table with alphabet header labels. We're attempting to mimic# the classic spreadsheet look. This goes back to VisiCalc on the Apple ][# introduced in 1979.#def createTable(self):## Define the max number of rows and the colomns. Lable the columns# with letters of the alphabet like spreadsheets since VisiCalc.#self.maxRows = 99self.headerLabels = ["A","B","C","D","E","F","G","H","I","J","K","L","M","N","O","P","Q","R","S","T","U","V","W","X","Y","Z"]self.tableWidget = QTableWidget()self.tableWidget.setRowCount(self.maxRows)self.tableWidget.setColumnCount(len(self.headerLabels))self.tableWidget.setHorizontalHeaderLabels(self.headerLabels)# Pre-populate the cells in the spreadsheets with data, strings in# this example.#for row in range(0, self.maxRows):for col in range(0, len(self.headerLabels)):self.tableWidget.setItem( row, col,QTableWidgetItem("Cell {0}{1}".format(self.headerLabels[col], row+1)))## Set every other row a light green color to help readability.#if row % 2 != 0:self.tableWidget.item(row,col).setBackground(QColor(220,255,220))self.tableWidget.move(0,0)## The next two function calls 'tighten up' the space around the text# items inserted into each cell.#self.tableWidget.resizeColumnsToContents()self.tableWidget.resizeRowsToContents()# Hook various events to their respective callbacks.#self.tableWidget.cellClicked.connect(self.cellClicked)self.tableWidget.cellChanged.connect(self.cellChanged)self.tableWidget.cellActivated.connect(self.cellActivated)self.tableWidget.cellEntered.connect(self.cellEntered)self.tableWidget.cellPressed.connect(self.cellPressed)# This is executed when the user clicks in a cell.#def cellClicked(self):for currentQTableWidgetItem in self.tableWidget.selectedItems():print(' Clicked:', currentQTableWidgetItem.row(),  currentQTableWidgetItem.column(),  currentQTableWidgetItem.text())def cellChanged(self):for currentQTableWidgetItem in self.tableWidget.selectedItems():print(' Changed:', currentQTableWidgetItem.row(),  currentQTableWidgetItem.column(),  currentQTableWidgetItem.text())def cellActivated(self):for currentQTableWidgetItem in self.tableWidget.selectedItems():print(' Activated:', currentQTableWidgetItem.row(),  currentQTableWidgetItem.column(),  currentQTableWidgetItem.text())def cellEntered(self):for currentQTableWidgetItem in self.tableWidget.selectedItems():print(' Entered:', currentQTableWidgetItem.row(),  currentQTableWidgetItem.column(),  currentQTableWidgetItem.text()) def cellPressed(self):for currentQTableWidgetItem in self.tableWidget.selectedItems():print('Pressed:', currentQTableWidgetItem.row(),  currentQTableWidgetItem.column(),  currentQTableWidgetItem.text())if __name__ == '__main__':app = QApplication(sys.argv)ex = App()print('PID',os.getpid())sys.exit(app.exec_())