dabbling in pyqt5 on a raspberry pi 3 b+, part 2

In the last post I wrote about installing PyQt5 and then playing with it a bit. Nothing serious, just my first stumbling starts to work in the PyQt5 environment. These next two examples are a tad more sophisticated, and introduce one or more surprises along the way. So let’s start out with a simple dialog with three buttons.

As you can see, not much there. The purpose of this simple dialog is to present these three push buttons. The only thing they do is to print a message when each one is pushed. The added feature with this example is to link each QPushButton instance with itself such that when any of the buttons are pressed, the console message explicitly says what button was pushed. For example, press the Blue push button and “PyQt5 Blue button clicked.” is displayed on the console command line. The same when you press Red and Green. How is this possible? Let’s look at the code.

#!/usr/bin/env python3import sysfrom PyQt5.QtWidgets import (QApplication,QPushButton,QHBoxLayout,QGroupBox,QDialog,QVBoxLayout)class App(QDialog):def __init__(self):super().__init__()self.setWindowTitle('PyQt5 Horizontal Layout')self.setGeometry(100, 100, 400, 100)self.createHorizontalLayout()windowLayout = QVBoxLayout()windowLayout.addWidget(self.horizontalGroupBox)self.setLayout(windowLayout)self.show()def createHorizontalLayout(self):self.horizontalGroupBox = QGroupBox("What is your favorite color?")layout = QHBoxLayout()buttonBlue = QPushButton('Blue', self)buttonBlue.clicked.connect(lambda: self.on_click(buttonBlue))layout.addWidget(buttonBlue)buttonRed = QPushButton('Red', self)buttonRed.clicked.connect(lambda: self.on_click(buttonRed))layout.addWidget(buttonRed)buttonGreen = QPushButton('Green', self)buttonGreen.clicked.connect(lambda: self.on_click(buttonGreen))layout.addWidget(buttonGreen)self.horizontalGroupBox.setLayout(layout)def on_click(self, pushButton):print('PyQt5 {0} button clicked.'.format(pushButton.text()))if __name__ == '__main__':app = QApplication(sys.argv)ex = App()sys.exit(app.exec_())

The key to the self-identifying buttons is in lines 29-30, 33-34, and 37-38. Each button is a unique instance, and when the connect function is called, the argument is a functional call (hence the lambda) to a Python method that takes one argument (see line 43). In that function, on_click, the function identifies the button by calling each instances text() function to get the identifying text and incorporate it (via string formatting) into the complete message. If I wanted to I could add additional logic inside on_click to actually do something based on the text value of the button. Of course this only works if each button is unique, but in a given practical instance, they should all be.

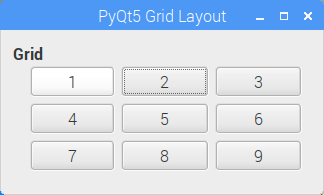
The next little PyQt5 app takes this a bit farther with nine push buttons in a grid pattern, similar to numeric keypad.

In the grid example, pressing any of the buttons will self-identify as before. The way this was set up, however, is a bit different than how the first app/dialog was set up. In the dialog each button was explicitly created and then linked to the the on_click callback. In this instance we gets a little fancy with some of Python’s interesting capabilities to create the nine buttons in the grid format.

#!/usr/bin/env python3import sysfrom PyQt5.QtWidgets import (QApplication,QWidget,QPushButton,QHBoxLayout,QGroupBox,QDialog,QVBoxLayout,QGridLayout)class App(QDialog):def __init__(self):super().__init__()self.setWindowTitle('PyQt5 Grid Layout')self.setGeometry(100, 100, 320, 100)self.createGridLayout()self.windowLayout = QVBoxLayout()self.windowLayout.addWidget(self.horizontalGroupBox)self.setLayout(self.windowLayout)self.show()def createGridLayout(self):self.horizontalGroupBox = QGroupBox("Grid")self.layout = QGridLayout()self.layout.setColumnStretch(2, 4)self.layout.setColumnStretch(1, 4)for label in "123456789":self.makeButton(label)self.horizontalGroupBox.setLayout(self.layout)def makeButton(self, label):button = QPushButton(label)button.clicked.connect(lambda: self.on_click(button))self.layout.addWidget(button)def on_click(self, pushButton):print('PyQt5 {0} button clicked.'.format(pushButton.text()))if __name__ == '__main__':app = QApplication(sys.argv)ex = App()sys.exit(app.exec_())

The key to setting this up lies in lines 34-35 and the function makeButton starting on line 39. Python makes it so easy to create a sequence of calls based on the number ‘1’ through ‘9’ just by iterating over a string with all the numbers. The makeButton function then creates the nine buttons with the unique label name, puts them in the grid, and of course provides the same self-reference for the click event like I did in the first app. Now when I click on any button, say the ‘1’ button, I get ‘PyQt5 1 button clicked.’ Every other numbered button self-identifies with the label it was created with.

The reason this is written in this manner is because, when I had the contents of makeButton inside the for loop, it would make each unique button, but the on_click would only print ‘PyQt5 9 button clicked.’ for every button pushed. It drove me crazy, and I still don’t know why it didn’t work running inside the for loop. Maybe I’ll figure it out later, but for now, this works, and you could say it’s the better software design because of how its all broken out.

dabbling in pyqt5 on a raspberry pi 3 b+

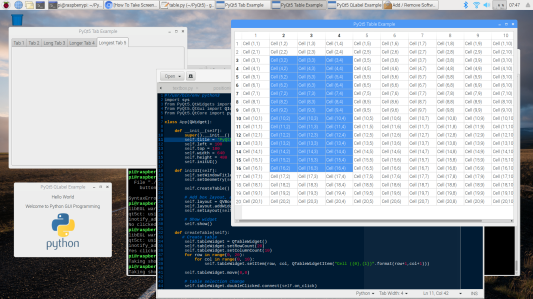
Raspbian Desktop with running PyQt5 demo applications

My work on the Raspberry Pi is a hobby of sorts, in which I bring to bear nearly 50 years of writing software in some language on some computer. I started when I was a highschool junior writing in APL on an IBM 360 mainframe. The little programs I wrote were games, in particular games to simulate landing on the moon (Apollo was important, and still flying, back then). Since that time I’ve programmed other mainframe, minicomputers (especially Vaxen), and just about every brand of microprocessor every developed. Now at the tender age of 65 1/2, I find I still enjoy writing software in some language on some computer. It’s just that right now, it’s C++ and Python on a Raspberry Pi 3 B+.

In this case, putting C++ aside for the moment, I want to talk about Python 3.5.3 and PyQt5 5.7.1. That version of Python comes standard with the latest version of Raspbian, version 9.9. I took this particular tack after wasting too much time trying to install the latest versions of Python and Qt5, only to scrub my Pi’s little micro SDXC card and start again. To get the tools I needed to create GUI applications on the Pi, I installed the following from the Raspbian repositories using apt:

sudo apt install qt5-default pyqt5-dev pyqt5-dev-tools

I’ve used Qt in the past, going all the way back to Qt3 and finishing with Qt4 back around 2008. So I had a pretty good idea what Qt was capable of, especially the changes wraught by Qt4. At first I tried to write Qt5 applications purely in C++, only to find that the libraries available for Raspbian were incomplete, and to add insult to injury, the implementation of Qt Creator had the JavaScript JIT disabled, such that it was incredibly slow to operate, even for Raspbian on the Raspberry Pi. I tried to pull down the sources and build a local copy of Qt5 for myself, but since a single compile cycle for all of Qt takes multiple days building natively on the Pi, after going through two such back-to-back cycles trying to debug what the build failed on, I then turned to the Raspian repo versions of Python and PyQt5 and got on with my life. With Raspbian you have everything you need either installed directly or easily available via the repos. And if the tools aren’t the latest and greatest, well, so what. It all works and that’s all that matters at this point.

Once those packages were installed I started to look around for some tutorials to help me get oriented with PyQt5. I found a site with lots of examples, and started to code my way up the learning curve. You can see some of those very primitive examples on the screen shot above. Of interest was a link on the site to download all the source. I figured I could rifle through the code for the interesting bits and build on that, but when I clicked on the link I was invited to buy the course in order to get the source code. No thanks, so I went back and continued to copy-and-code. That’s when I came across the QTabWidget example, and ran into a number of problems as well as noting that some of the coding in his version was Wrong. First, here’s my listing with everything cleaned up.

#!/usr/bin/env python3import sysfrom PyQt5.QtWidgets import ( QMainWindow, QApplication, QPushButton,QWidget, QAction, QTabWidget,QVBoxLayout)from PyQt5.QtGui import QIconfrom PyQt5.QtCore import pyqtSlotclass App(QMainWindow):def __init__(self):super().__init__()self.setWindowTitle('PyQt5 Tab Example')self.setGeometry(100, 100, 640, 300)self.setCentralWidget(MyTabWidget(self))self.show()class MyTabWidget(QTabWidget):def __init__(self, parent):super(QTabWidget, self).__init__(parent)# Enable the ability to move tabs and reorganize them, as well# as close them. Setting tabs as closable displays a close button# on each tab.#self.setTabsClosable(True)self.setMovable(True)# Create tabs in tab container#self.tab1 = QWidget()self.tab2 = QWidget()self.tab3 = QWidget()self.tab4 = QWidget()self.tab5 = QWidget()# Add tabs#self.addTab(self.tab1,"Tab 1")self.addTab(self.tab2,"Tab 2")self.addTab(self.tab3,"Long Tab 3")self.addTab(self.tab4,"Longer Tab 4")self.addTab(self.tab5,"Longest Tab 5")self.currentChanged.connect(self.tabSelected)self.tabCloseRequested.connect(self.closeRequest)# Add test content to a few tabs#self.tab1.setLayout(QVBoxLayout(self))self.tab2.setLayout(QVBoxLayout(self))self.pushButton1 = QPushButton("PyQt5 Button 1")self.tab1.layout().addWidget(self.pushButton1)self.pushButton2 = QPushButton("PyQt5 Button 2")self.tab2.layout().addWidget(self.pushButton2)#@pyqtSlot()def tabSelected(self):print("Selected tab {0}".format(self.currentIndex()+1))def closeRequest(self):print("Tab close request on tab {0}".format(self.currentIndex()+1))if self.count() > 1:self.removeTab(self.currentIndex())if __name__ == '__main__':app = QApplication(sys.argv)ex = App()sys.exit(app.exec_())

If you’re following along, here’s his example.

Trust me when I say that my version works as advertised. Let me go over the issues and fixes:

  • The class MyTabWidget is derived from QTabWidget, instead of deriving from QWidget and then instantiating an instance of QTabWidget to work with.
  • The signal-and-slot callbacks to execute when a tab was selected were never connected, and when I finally connected them, then they never worked. I added the correct callbacks in lines 44 and 45.
  • The on_click callback in the original was renamed tabSelected to make it easier to understand.
  • A new callback, closeRequest, was created and connected to the tab’s close signal.
  • On lines 26 and 27 of my version, setTabsClosable and and setMovable, were both set to True. This turned on the close buttons and made the tabs more interesting by allowing them to be moved around.
  • Layouts were improperly set up. The proper way to add a layout to a tab and then to use it are shown in lines 49 through 54.
  • And there were other little cleanups to make the code more readable.

I get all cranky when I come across badly written code that looks like it wasn’t really run by the author. The original looks like a poor copy of someone else’s code. I may (or may not) put up my own set of tutorials that are clean, correct, and interesting. And I won’t charge a penny for them.

Here’s two screen shots of my version running:

You’ll note I added two QButtons to make sure that the widgets were being properly managed by the tabs. If you have a Raspberry Pi and install PyQt5, then you should play with this and see what happens when you move tabs around or delete any of them, especially those with widgets. The tabs with widgets will clean up after themselves in my version.