
Prerequisites
A Raspberry Pi 3B+ or 4 with Raspbian Buster installed and connected to an Adafruit Circuit Playground Express via a micro USB to USB cable and with CircuitPython installed on the Circuit Playground Express (see working with the adafruit circuit playground express using the raspberry pi 4).
Circuit Python Programming Example 5
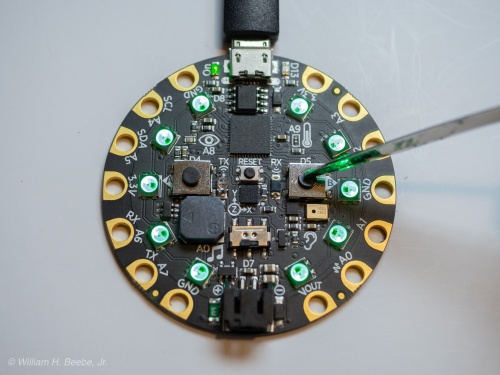
Using the same setup with the Adafruit Circuit Playground Express (CPE) and the Raspberry Pi 4 we used in the last two posts, I’ve writen another Python application that senses and uses push buttons A and B and the slide switch on the CPE.
Using the push buttons and the small slide switch, the Python application will light up all the NeoPixels in various colors. The application will react to single button pushes as well as having both pushed simultaneously. The listing for the application is at the end of the post.
The CPE comes with a number of interesting inputs. Three of them are two push buttons, labeled A on the left and B on the right, with a small slide switch just above the JST battery connector at the bottom center of the CPE. It’s a surface mount single pole single throw (SPST) slide switch. If slid to the right, it’s off. If it’s slid to the left, then it’s on, and on means it’s detectable as such in code.
When the code in this example is saved to the CPE as main.py, then the application works as follows:
| Push button A | Push button B | Switch | NeoPixels |
|---|---|---|---|
| Open | Open | N/A | Off/Black |
| Pushed | Open | Open | All Yellow |
| Pushed | Open | Closed | All Red |
| Open | Pushed | Open | All Blue |
| Open | Pushed | Closed | All Green |
| Pushed | Pushed | Open | Split Yellow/Blue |
| Pushed | Pushed | Closed | Split Red/Green |
The push buttons combined with the switch provide six lit NeoPixel display states as shown in the table above.
The application also illustrates another aspect of programming the CPE. If you want the application to run continuously, then you write and endless loop. Line 71 uses a ‘while True’ to keep the application running. It will only stop if you turn the power off to the CPE or it has a programming error of some type.
# Circuit Playground Express example.# Uses the NeoPixels, the A and B pushbuttons, and the switch.#import board, neopixel, timefrom digitalio import DigitalInOut, Direction, Pull# This is the small slide switch located in the center of# the circuit board, just above the JST Battery Connector.#switch = DigitalInOut(board.D7)switch.direction = Direction.INPUTswitch.pull = Pull.UP# This is the 'A' push button, the left push button on the circuit board.#buttonA = DigitalInOut(board.BUTTON_A)buttonA.direction = Direction.INPUTbuttonA.pull = Pull.DOWN# This is the 'B' push button, the right push button on the circuit board.#buttonB = DigitalInOut(board.BUTTON_B)buttonB.direction = Direction.INPUTbuttonB.pull = Pull.DOWN# Basic NeoPixel colors to play with.#RED = (31, 0, 0)YELLOW = (31, 31, 0)GREEN = (0, 31, 0)AQUA= (0, 31, 31)BLUE= (0, 0, 31)PURPLE = (31, 0, 31)WHITE = (31, 31, 31)BLACK = (0, 0, 0)# An instance of the NeoPixels to work with programmatically.#pixels = neopixel.NeoPixel(board.NEOPIXEL, 10, brightness=.2)pixels.fill(BLACK)# To support guard logic around printing push button states.# We only want to print out when a button press is first# detected, and then we want to print out when the button is# released.#Apressed = FalseBpressed = False# A simple polling loop. The loop runs forever once it's entered# because of while True:, and it is constantly checking the state# of A and B pushbuttons, acting according to what it detects.## 1. If neither push button is pressed, the NeoPixels are dark.## 2. If Button 'A' is pressed and the switch is on,#turn on all NeoPixels as RED.# 3. If Button 'A' is pressed and the switch is off,#turn on all NeoPixels as YELLOW.# 4. If Button 'B' is simultaniously pressed, then only fill#the NeoPixels on Button A's side based on switch position.## 5. If Button 'B' is pressed and the switch in on,#turn on all NeoPixels as GREEN.# 6. If Button 'B' is pressed and the swith is off,#turn on all NeoPixels as BLUE.# 7. If Button 'A' is simultaniously pressed, then only fill#the NeoPixels on Button B's side based on switch position.#while True:if (buttonA.value):if (not Apressed):print('Button A pressed')Apressed = Trueif (switch.value):print('Switch on')if (not Bpressed):pixels.fill(RED)else:pixels[0:5] = [RED] * 5else:if (not Bpressed):pixels.fill(YELLOW)else:pixels[0:5] = [YELLOW] * 5else:if (Apressed):print('Button A released')Apressed = Falseif (not Bpressed):pixels.fill(BLACK)else:if (switch.value):pixels[0:5] = [GREEN] * 5else:pixels[0:5] = [BLUE] * 5if (buttonB.value):if (not Bpressed):print('Button B pressed')Bpressed = Trueif (switch.value):print('Switch on')if (not Apressed):pixels.fill(GREEN)else:pixels[5:10] = [GREEN] * 5else:if (not Apressed):pixels.fill(BLUE)else:pixels[5:10] = [BLUE] * 5else:if (Bpressed):print('Button B released')Bpressed = Falseif (not Apressed):pixels.fill(BLACK)else:if (switch.value):pixels[5:10] = [RED] * 5else:pixels[5:10] = [YELLOW] * 5All the highlighted code is the logic I added to only perform an action once when either push button is pressed or released. Without that guard logic in place, those print statements would stream on the serial debug console. This makes tracking actions very difficult, if not impossible, to do. It also keeps the logic running in the loop to a bare minimum and allows it to run as fast as possible. Not only would the print statement stream without the logic, but manipulation of the NeoPixels would be non-stop. We only want actions to be performed once on a button state transition (non-pressed to pressed, and released).
The REPL
The screen command can still be used to connect to the device as shown in the earlier posts, but when it first connects nothing will be displayed unless an explicit ‘print()’ statement sends it out. To open the REPL while this application is running type [Ctrl] C and then Enter. To exit the REPL type the usual [CTRL] D and the application will start running again.


You must be logged in to post a comment.